Creating and delivering an amazing speech isn’t easy. And it’s not uncommon for people to run into the same roadblocks over and over. Sometimes it’s the fear of public speaking that gets you. And at other times, you might struggle with not knowing how to communicate your message in the best way.
Well, you’re probably here because you want to become a better speaker as quickly as possible. And today, I’m going to make that really easy for you. All you have to do is take a few minutes out of your day and take action on just one of the 15 public speaking tips below.
Ready? Let’s get going!
Table of Contents
1. Grab attention and amplify your body language by putting verbs into action
Action verbs are just what they sound like, words we use to describe an action. Whether it’s running, swimming, speaking, preparing, or reviewing, these action verbs are all here to tell us what’s happening at the moment.
You use action verbs in your speeches too — all the time. And do you want to know the secret to grabbing attention and amplifying your body language/nonverbal communication? Well, it all comes down to noticing when you use a specific action verb and performing an action to go along with it!
Easy as that. You can do a hand motion, walk in a certain direction, turn around on stage, or just be yourself and get creative.
The point is, you associate a physical action with every action verb you say in order to give your speech that extra bit of “oomph”.
Here’s how you can implement this strategy in your next speech right away
Get out a piece of paper or open a Google Doc. Whatever writing tool you use to get in the zone.
Start by writing out the topic of your speech and then your three main points.
This is where it gets interesting. You’re going to talk through your speech as if you’re out there presenting right this second. Talking out loud is better but you can also do this in your head if you’d like. You really want to do your best here and trick your brain into thinking you’re actually presenting.
And while you’re talking through your speech, you’re going to be hunting for action verbs.
St. Cloud State University published a guideline (way back in 1999) with a few great tips on making identifying verbs easier. Luckily, English grammar hasn’t changed much. But best of all? We can still use these tips to get results straight away.
Here’s what you’re going to do.
As you’re going over your speech, pay extra special attention to personal references like:
I, You, He, She, It, We, and They
Verbs only make sense when they’re inserted after a pronoun or subject.
For example:
- I ____________ … ran
- You __________ … jumped
- He ___________ … stumbled
Whatever word fits in the blank is a verb!
And whenever you spot a verb, you’re going to write it down. Go ahead and do this now and then we’ll pick up where we left off.
[Pause Here and Make a List of Verbs Your Speech Contains]
Got your list of verbs? Good. Now what you want to do is attach an action to each one of the verbs you’ve written down. Let’s go over how to do this.

For example, maybe in your speech, you found yourself saying, “I struggled…” quite a bit.
How would you translate this to action? Well, you could put both of your hands into fists and bend your elbows as if you’re struggling or frustrated.
And whenever the word “struggled” or any of its variations come up in your speech, you can have that action ready to go.
This makes your speech feel more dynamic and alive.
As a final thought, limit yourself to 3-5 actions during your speech. Any more and you can be waving your hands for an indefinite amount of time and actually be distracting your audience from your message.
The ball’s in your court. Get out there and implement!
Public Speaking Tips & Action Verb Resources:
A Huge List of Action Verbs – Feeling stuck? Here’s a huge list of action verbs that can help you get going in the right direction. Look over this list if you’re not quite sure what you should be looking for.
Examples of Action Verbs in Sentences – What better way to get your mind going and start picking up on the action verbs: Looking at example sentences!
2. Crush anxiety and your biggest fears with a double contingency plan

We all do it at one point or another. We keep wondering “what if?”, and don’t realize that having those thoughts in the back of our mind contributes to a great deal of anxiety.
What would it feel like to be free from the fear of “what ifs” once and for all? Forever.
Well, it’d be amazing, of course! And the good news is you can do exactly that by creating a double contingency plan.
The dictionary defines a contingency as: “a future event or circumstance that is possible but cannot be predicted with certainty”. We’re going to be planning for these possible events that we fear and creating a plan to deal with them if they ever come up.
Uncovering Presentation Fears
You’re going to dig deep to find the two biggest fears you have about presenting and then create a contingency for each fear.
Here’s how:
Take out a pen, piece of paper, or open up an empty Google Doc. We’re getting ready to write some things down!
Now, find somewhere to sit free from any outside distraction. You’re going to be doing some thinking and introspection here, so you don’t want any noises or movements to distract you. Absolute silence is the key.
Isolated? Good. Close your eyes and imagine yourself getting ready to get up in front of a group of people and speak.
What thoughts creep into your mind? What are you most scared of? What are you worried might go wrong? Write it all out.
For example, some of the thoughts I had when doing this exercise were:
- What if I freeze up and don’t know what to say as soon as I get up there?
- What if the projector fails and I embarrass myself?
- What if the microphone doesn’t work and I have to try to speak loudly?
- What if the speech completely bombs and nobody connects with my message?
- What if I get “booed” off-stage?
- What if someone asks a question I can’t answer on the spot?
- What if I trip and fall while I’m walking up to speak?
- What if I stumble while talking and twist my words?
The list is literally endless. These are all valid fears. But the goal of this exercise is to completely disarm them.
Once you have your list written down and ready to go, you’re going to want to rank your list.
When raking your list, #1 is your absolute biggest fear. And then the last number on your list would be something you don’t fear all that much, but it has been on your mind at one point or another.
Stop here and go rank your list.
Here’s my ranked list:
- (2) What if I freeze up and don’t know what to say as soon as I get up there?
- (7) What if the projector fails and I embarrass myself?
- (8) What if the microphone doesn’t work and I have to try to speak loudly?
- (3) What if the speech completely bombs and nobody connects with my message?
- (4) What if I get “booed” off-stage?
- (1) What if someone asks a question I can’t answer on the spot?
- (6) What if I trip and fall while I’m walking up to speak?
- (5) What if I stumble while talking and twist my words?
Once you have your list all ranked, take #1 and #2 and write them down where you can clearly see them. These are your top two fears that we’re going to tackle straight away.
Have you ever heard of the 80/20 rule? It basically says that 20% of the work you do makes up 80% of the results. And this holds especially true for what we’re doing right now, with breaking down your speaking fears.
We’re taking the top two biggest fears you have and creating contingencies for each of them. And since they’re your two biggest fears, they probably make up around 80% of your speaking fears overall. Once we break these down, that’s a huge win!
Alright, once we ranked our list, we have our #1 and #2 fears. Here are mine:
- (1) What if someone asks a question I can’t answer on the spot?
- (2) What if I freeze up and don’t know what to say as soon as I get up there?
What comes next is the most important part of this process. It’s time to develop our contingency plan.
What you’re going to do is take your #1 and your #2 fears, and write out a list of 5-10 things that you can do if these things actually do happen!
So, for example, I’ll take my #1 fear of somebody asking me a question that I can’t answer right there on the spot. What will I do if that happens? What is my contingency plan?
Before we dive into our contingency plan, a quick note: Preparation is the key to great speeches, and you should try to prepare as much as you can in order to answer any question that comes up. After all, if you’re up there speaking, you are the expert. This is just an example to show the rare case that somebody really asks something out of your league.
Contingency Plan
If somebody asks me a question that I can’t answer right on the spot, I’m going to…
Repeat the question to my audience so everyone hears it; this also gives me a moment to collect my thoughts
Keep my cool and not get too carried away or nervous with the fact that I don’t know what I’m going to say. I’m going to stay calm and collected.
Tell the audience member that I’d love to discuss the question with them further, but that we’re going to have to take that question “offline”. This means that after the presentation I can meet up with that audience member and answer their question. And this will have given me more time to prepare and think of a proper answer instead of being put on the spot and not knowing what to say.

There it is: Contingency #1!
You’re going to repeat this process for your #2 fear.
Remember, you want your contingency to be as detailed as possible.
Having a plan like this literally melts anxiety since you know that if what you fear most actually happens, you’re well prepared to take care of it.
You know exactly what you’re going to do.
Now it’s your turn. Review this section again as a refresher and get going on your double contingency plan! Don’t forget to look over your plan before each speech to get comfortable with exactly what you’re going to do.
This process takes a little bit of thought, but in the end, your contingency plan will pay off big time!
3. Stay organized by arranging material into an outline
Every powerful speech you’ve ever listened to has a structured, defined flow to it, managing to grab your attention and keep you on your toes. Each point smoothly leads to the next.

You, too, can reach this level of “flow mastery” by arranging your material into a strategic outline.
You have to remember that your audience can’t remember everything.
They have a brain capacity — a maximum limit. By breaking down your message into a structured outline with actionable takeaways and three main parts, it’s going to make it easy for your audience to remember your speech and follow along.
Best of all, your listeners will be much more likely to take action once they’ve connected all the dots.
Here’s how you can outline your speech
Write down your topic. Every single supporting point you have will tie into your main topic directly.
After you have your main point written down, you want to think about three key points that communicate your message the clearest.
You can think of it like this (fill in the blanks for your topic):
“If I was listening to somebody talk about [Your Main Topic], I would want to hear about [Supporting Point 1], [Supporting Point 2], and [Supporting Point 3].”
What are your three absolutely key supporting points that you have to touch on for your listeners to really connect with your message?
It’s tough, but it’s definitely worth putting as much thought as you can into this step.
Here’s what you should have so far:
- Topic: How to Pick Strawberries
- Supporting Point 1: The importance of picking strawberries. It’s an experience. When you pick strawberries in your free time you’re getting outside. It can be a fun family activity.
- Supporting Point 2: How do you find the best strawberry farms? You have to know the seasonal months when strawberries are ripe for picking.
- Supporting Point 3: What do you need to know and bring? You’ll need some equipment like a basket, solid shoes in case it rained before (to protect yourself from the mud), and you have to be able to identify a good berry from a bad berry.

In this example, we’re giving a talk about picking strawberries.
We have our main point, and then we thought about everything we need to cover to give our audience a really good starting point for picking strawberries.
At the end of our talk, they can literally go outside, find a strawberry farm, and get picking!
After we have our supporting points ready to go, it’s time to elaborate on each point and give them some meaty information.
I explain speech creation in all of its raw detail in the “Pyramid Speech Method”.
If you want a definitive formula to never get stuck while creating a speech ever again, you can grab your copy of the Speech Pyramid worksheet right now.

Writing your outline is the bulk of the work. Once you have your outline ready to go the rest of your content takes care of itself. It’s much easier to fill in an outline than create a whole speech from an empty page.
Go ahead and implement what you’ve learned in this step and create an outline for your next speech!
4. Start strong and shock your audience with a catchy opening hook
When I say that an opening hook can make or break your presentation, I’m not joking. It’s so easy for people to zone out if they think even for a second that you sound boring. Or if they assume that they already know what you’re going to say.
You have to grab them right then and there. You have to shock them!

A poor hook is deadly if you want an engaged audience. And because we know how crucial a good attention-grabbing hook can be for your presentations, we’re going to show you how to craft an incredible one.
Let’s dive right in and go through the process step by step!
The first thing you want to do is take out a pen and paper (or your favorite note-taking tool) and get ready to write some ideas down.
There are several categories of hooks that are proven to be very effective when starting out a speech.
You’re going to come up with your version for all of these hooks, and then choose the best one to use for your next presentation.
Here are some of the hook types we’re going to be working with:
- Inspiring Quote
- Humorous Anecdote (Personal Story)
- Shocking Statistic
If you’ve ever heard a speech that draws you in from the beginning and makes you crave to hear more, there’s a pretty good chance that the speaker was using one of these common hooks to grab your attention.
Now let’s dive into the details of each of these hook types.
Inspiring Quote
Sometimes all it takes for your audience to lift their heads up and start listening intently is a well-placed “quote-hook” at the beginning of your presentation.
For example, let’s say you were giving a speech about change. The main point you want to make to your audience is that small actions over time drive big results and make a big impact.

You really want them to understand that in order for them to start making a big impact, they have to consistently work on their small sub-goals.
We could start this speech off with an inspiring quote from Confucius that grabs their attention and makes them wonder where you’re going with this train of thought:
“The man who moves a mountain begins by carrying away small stones.”
– Confucius
Or if your speech is about making an impact, you can start off with a Mark Twain quote:
“The two most important days in your life are the day you are born and the day you find out why.”
– Mark Twain
These are just examples of course, and I’m sure you’ll find some amazing quotes that match your topic.
Here’s a great resource for finding quotes to get you started: Quote Search
Humorous Anecdote
What is an anecdote exactly? Well, it’s just a short story that makes everyone listening either think or laugh.
Here are a few examples to get you thinking about crafting your own:
A firefighter starts giving a speech about the importance of fire safety and tells a short story (a cautionary tale). In this story he warns everybody and talks about a serious injury he endured because he didn’t want to follow fire safety procedures.
While talking to a small group of students about how speaking for the first time can be nerve-racking, the professor talks about an embarrassing situation that occurred to him during his first speech. His story makes everyone laugh.
If you want more examples of anecdotes, check out this article.
If you want to use an anecdote to set the stage for your speech and prepare your listeners, this short article gives a great example.
Shocking Statistic
A shocking statistic that your audience doesn’t expect can be a great way to make everyone’s ears perk up and get them to start listening.
Not only can a great statistic be a good memorable hook for your speech, but it can also add realism and increase your credibility.

Let’s start with an example.
Say you’re giving a speech about the importance of seat belts while driving. Your shocking statistic could be:
“In the magazine Science, it was reported last year nearly 45,000 people died in auto collisions, the equivalent of a fully-loaded passenger jet crashing with no survivors every day for a year.”
Source
The example above combines imagery with the statistic, making it more impactful and real to your audience.
Now, you might be wondering how and where you can actually find good statistics related to your speech topic.
A good place to start is usually a Google search with the following keywords:
“Your speech topic” + statistics
This can take you down a trail of various websites, sources, research papers, etc. that all have a variety of statistics for you to pick and choose from.
Key things to remember:
Key Point 1: Always make sure your statistic has a reputable source behind it.
If you find a statistic and can’t verify it with a source, it’s probably worth scrapping.
You always want to be seen as true, genuine, and real. If you use a statistic that doesn’t have a solid research backbone behind it, then you’re building your foundation on the sand and it can collapse at any moment.
As soon as one of your listeners realizes the statistic isn’t reputable, they’ll probably call you out on it.
Key Point 2: Choose the most interesting and shocking statistics
When you’re making a list of possible statistics you can use in your speech, you should be narrowing them down based on which ones stand out the most and are the most “shocking”.
Don’t choose a statistic just because you like it.
A good technique is to ask other people what they think. This can be a few of your friends or people from a similar audience to the one you’ll be speaking to.
Come up to them and say, “Hey, I’m thinking about using some statistics in a speech – which of these stand out to you the most?”
… and you’ll be well on your way!
We just went through some basics for creating a hook that captures your listener’s attention and makes them want to listen more and more.
Now it’s your turn:
Start by writing out a possible hook for each of the techniques we discussed above.
After you have all of them written down, narrow it down to the one that stands out the most and matches your speech the best.
Let’s get going!
5. Move your audience towards action by speaking with persuasive intent
We all give speeches for a reason. You don’t ever walk up on stage and talk on a whim with no end goal in mind.
Sometimes our goal is to spread our key message and move people emotionally.
Other times we’re trying to pitch a product or a service. You speak for a reason, whether it’s to grow your brand or to make yourself more well-known as an expert.

This is precisely why you have to do everything in your power to align your presentation towards your end goal.
After all, if you’re not actively moving your audience towards your ultimate goal, what’s the point?
Developing Persuasive Intent
So, let’s get going and break down how you can speak with persuasive intent and move your listeners towards action!
The first thing you want to do is get out your favorite note-taking tool. Across the top of the page, write out one of the things you want to get out of your speech.
Once you have the first one down, write out another thing you want to get out of your speech.
The important thing here is to imagine that anything is possible. Don’t limit yourself based on what seems “realistic” or not. This is just the brainstorming phase.
After you have 5 or more reasons written out, you’re going to want to take a highlighter, red pen (or something that stands out), and circle the main reason you’re giving your speech.
Take some time to think of your biggest reason.
This might be super easy for you if you already know exactly what it is that you want from your speech, such as more sales or more people hearing your message.
Once you’ve decided on that one thing and circled it, it’s time to reverse-engineer your main goal and write your speech backward!
This is counterintuitive to how many speakers do it. Usually, they start from the beginning and work forwards, developing one point at a time.
But you’re going to take a different approach.
You’re going to start with your main goal and work backward to figure out how you can get people to take action at the end of your speech
Here’s an example:
Let’s say your main goal is to get your audience to realize how important a healthy, balanced diet is to their overall health.
And let’s say you have a small booklet that you’re going to be giving away in the back of the room after your speech.
This booklet has your contact information along with some super practical advice on healthy nutritious recipes and grocery store shopping lists. Things people can use right away to start eating healthier.
Our main goal then becomes: Help people go from having no idea about how to eat healthy to picking up the “Nutritional Secrets” booklet and uncovering recipes and shopping lists they can use right as they leave the room.
How can you drive people to take action and pick up your booklet?
Well, we can show them the importance of a healthy diet and show them how much healthier they could be if they adjusted their diet accordingly. Then we can offer them a solution they can use right this second to start getting results.
Here’s how this would look with a “3-bullet” speech
Explain the importance of a healthy nutritional diet and some examples of what could happen if they start eating healthy in a consistent manner
Show them the flipside. Go through a few examples of health issues people have encountered from unhealthy eating, and give them some shocking statistics about how a bad diet breeds bad health
Tell them that they can get started today, in minutes, by getting a list of super-easy healthy recipes anyone can make, even if they’ve never cooked before.
“You can pick up these recipe and shopping list booklets in the back — they’re free, and there’s plenty for everyone!”
Example
By the end of your speech, everyone in your audience will know exactly why they should head to the back of the room and pick up a booklet: It means they care about their health!
This was just an example – and now it’s your turn!
Go through the exercise above and create your own persuasive goal and your speech bullet points that lead up to that goal.
You’ll be able to include those bullets into your next speech and hit the ground running towards your goal.
6. Take control of the room and exude confidence by pausing at key moments
Pauses are a powerful and effective way to emphasize key points in your speech. If you watch some of the most famous speeches, you’ll notice that the speaker knows exactly when to pause for maximum impact.

They know when to slow down to really drive their point home.
And they know exactly when to pause to make you think.
But there’s more. The difference between an experienced speaker and a novice can be measured by how they react to silence. Let me explain.
A poor speaker wants to close any gaps of silence with filler words and generally feels uncomfortable in the moment. An experienced speaker, on the other hand, stays confident throughout the silence and actually goes a step further to use that silence to their advantage!
How you can include pauses in your next speech to your advantage
The key is to pause at key moments for about 3-8 seconds. You can pause either just before key statements or right after a story.
When you pause, you’re essentially bringing your audience further into the speech and drawing them in. When the speaker is silent, even someone who is busy on their phone can’t help but look up!
It’s a powerful tool.
We’re going to dive into a few pauses you could find yourself using fairly frequently:
- The Opening Pause
- The Transition Pause
- The Tension-Building Pause
So let’s get to it!
We’re going to go into these three common pauses one by one.
The Opening Pause
The opening pause, just as the name suggests, is something we try to squeeze in at the beginning of your speech.
As a general rule of thumb, you’ll want to pause for about 3 seconds.
Why is this useful?
Well, it’s going to get your audience to settle down, look up from whatever they’re doing, and actually pay attention to you.
Whenever a speaker goes silent for a few seconds the audience can’t help but look up and listen. It disrupts their attention and gets them to look up out of curiosity.
And the best part is, it’s an almost universal cue. Why not use it to your advantage?
Pausing at the very beginning of your speech can help you build that first bit of anticipation and start your talk off with a bang.
The Transition Pause
Transitional pauses can help with the overall flow of your speech when you sprinkle them in throughout your talk.
At its most basic level, the transition pause helps your audience understand you better and more easily comprehend what you’re trying to say.
And to make it even easier for you, it’s pretty easy to remember where a transitional pause goes in your speech:
It goes exactly where a period would go if your speech was written down on paper!
When you think about where a period would go and pause for a second, you’re essentially “slowing down to move faster”.
Transitional pauses give you time to think and make you more aware of what you’re saying. Most importantly though, you’ll also be more aware of how you’re saying it since your delivery is just as important as your content.
For example, let’s say you were talking in long run-on sentences and didn’t know it.
If you thought about where your pauses would go (where all the periods are in your speech), then you’d catch this immediately because it just wouldn’t sound natural.
Transitional pauses are useful for both comprehension and understanding.
So get ready to help your audience understand exactly what you’re trying to say and sprinkle in some transitional pauses!
The Tension-Building Pause
“You’ll never guess what happened next… (3-second pause)”
Example
That right there is a tension-building pause.
It builds up a bit of “tension” in your speech and helps your listeners get excited about what’s coming up next.
When you heighten the tension you naturally get your audience more involved in your speech, and that’s a very good thing.
I want you to make a note of this because it’s very important:
Use tension-building pauses before any major point or dramatic engaging story. It’ll make your presentation more engaging and “real”.
Look at it this way…
At the end of the day, building up some tension and having your audience at the edge of their seats is a good thing.
It means they’re actually listening!
So, how do you feel about pauses?
We went through three really common pauses you can use in your next speech: The Opening Pause, Transitional Pause, and Tension-Building Pauses.
I challenge you to read through these three pauses one more time and master where they go in your speech (i.e. a transition pause would replace a period, etc.)
This will help you remember where they go and actually include some pauses in your next speech!
7. Melt your stress away by working out before a speech
Whenever you want to melt your stress away and feel more clear-minded and full of energy, nothing beats burning off some cortisol through 30+ minutes of exercise.
Speaking of exercise, the intensity of your workout matters.
It matters a lot.

If you find yourself constantly stressed out, constantly worrying, and thinking about how you’ll perform in an upcoming speech, then that’s a sign that you’ve got to take a step back and hit the gym for at least 30 minutes.
And if you don’t like gyms there are plenty of heart-pumping exercises you can do on the go.
The main goal here is to get your blood flowing!
Exercising to melt your stress away is going to work wonders in how you feel and think. I’m saying this from my own personal experience.
It’ll make you more clear-headed and focused.
And because I know firsthand how easy it is to shrug this tip-off and never act on it, let’s walk through scheduling an exercise session in your calendar right now.
You’re going to have absolutely no excuse to skip your next workout.
And the best part: It’s going to be well worth it!
All you need to do is get your heart beating faster than usual for at least 30 minutes. That’s it!

Let’s get started:
If you use a calendar app like Google Calendar or Apple Calendar, go ahead and pull it up.
If you prefer to use a paper calendar or a physical notebook, get it out and flip to today’s date.
Look ahead to the next three days and find an open time slot of at least 2 hours where you don’t have anything going on.
Why 2 hours? So you don’t feel pressure before or after your exercise time block.
The goal here is to give you some time to get ready and then some time to wind down afterward without feeling rushed.
If you’ve found a nice 2-hour time block that you can use, great!
And if not, there’s no need to worry.
You can shrink your exercise time block down to about 45 minutes to 1 hour and go for a 30-minute walk or a 30-minute jog instead.
Whatever fits your calendar and whatever fits your style. As long as it increases your heart rate for 30 minutes, it’s good to go.
Finally, it’s time to pencil it in!
Grab your calendar tool or your pen and block off a time block for your short 30-minute exercise session.
And there you have it!
But… don’t be mistaken. The hardest part is yet to come!
If you don’t have an exercise habit already, doing this consistently is tough. Don’t let anyone tell you differently.
This is why we have to plan for what might go wrong.
You might wake up that day and not feel like going to the gym. Make a decision right now that you’ll push through.
You might have a terrible day and the last thing you want to do is go to your exercise session. Make a decision right now to push through and do it anyways.
As of this moment, you’re committed.
And after you see how good it makes you feel, I can guarantee you’ll be hooked.
Good luck, and let’s get out there!
8. Uncover and fix your flaws through preparation and practice
Nobody wants to “uncover their flaws”.
I’m pretty sure you don’t want to be digging through your life and finding everything you’re doing wrong.
That only breeds negativity, and we’re not about that here!
Speaking for myself, I’m typically a positive-minded person (and please understand, this doesn’t mean I go around smiling at everyone and everything even when things are bad; we’re all human).
It just means I’m a glass-half-full kind of guy.
So where am I going with this exactly?
The importance of preparation and practice
We all know it’s necessary, but there are times when it can bring us down and make us feel like we’re failing. When it feels like our practice isn’t doing anything and that it only leads to failure.

But the truth is: We’re not failing! We’re only improving.
In the grand scheme of things, consistently practicing and preparing for your upcoming speech is time well spent.
And if you practice correctly (see below), you’ll be able to uncover your flaws and actively work on fixing them.
That’s how you become a better speaker. You speak more!
Let’s dig into the details.
Practice and Prepare. Often.
If you want to get better at speaking you’re going to have to take this seriously and not just brush it off as something you’ve heard a thousand times before.
I’m sure you’ve heard people say “practice more!” over and over again.
They probably yelled “prepare or fail!” from the rooftops.
But the fact of the matter is this:
Nothing can take the place of proper practice and preparation for your speech. Nothing.
Of course, there are “edge cases”.
You can go ahead and “wing it”, but your results and your delivery won’t be nearly as good as if you would have put a good 30 hours of raw practice into your speech.
It just won’t be the same. I stand by this firmly.
You’re going to have to practice and prepare. And you’re going to have to do it often.
If you want to become a great speaker, that’s the path you’re going to have to take.
No matter what anyone wants you to believe, remember that there is no magic bullet.
There’s no “weird trick” or “secret formula” that’ll get you there.
Raw practice is the answer
And I’m going to show you a few techniques you can use right now, today, to practice better.

Here they are:
The first practice technique you can use is to write out the key points of your speech. Under each of your key points, write a few sentences describing that key point.
Make sure the sentences you write down under each point are the essentials. These are things that you’re 100% sure you want to tell your audience.
After you have this basic layout done you can use it to practice your speech.
What will this accomplish?
It’ll keep you on track.
You won’t go on any tangents or say too much excessive “fluff”. Having an outline to practice from is going to streamline your practice sessions and let you stay on target!
Get used to watching yourself in the mirror. This is a great practice technique that’s thrown around quite often, but so few people actually do it.
It feels weird. You feel strange talking to yourself in the mirror, looking at yourself, and observing yourself.
I know, I get it.
I felt the same way when I first tried this out.
But I’m going to be very blunt here: You need to get over your weirdness and just do it!
This is a technique that works!
So why wouldn’t you give it a shot? A genuine shot.
Not just a half trying attempt where you say a few sentences and then just decide “this is weird” and walk away.
So here’s my challenge to you:
Get in front of a mirror. Any mirror.
And just start talking.
Pretend that you’re actually speaking directly to somebody. That there’s a live human being standing right in front of you, and that you’re having a conversation with them about your speech topic.
You can use the outline sheet you created in our first practice technique to help you stay on track.
And while you’re talking to yourself in the mirror, you’re going to be on the lookout for the following:
Body language. Do you look nervous? Are you constantly looking around, or pacing back and forth too much?
Facial expressions. Are you cringing or wincing during your speech? Do you look happy, engaged, and energetic? Do you look warm and welcoming?
Too many filler words. Are you saying “um” a lot? Are you filling empty spaces with words instead of pauses?
Speed of delivery. Are you talking extremely fast? Are you nervous?
Flow. Do you know your topics and points well enough to smoothly talk through everything you want to say? Are you getting stuck?
Make a note if you notice any of these and start your speech again.
Focus on one thing at a time to improve.
For example, if you find yourself saying “um” a lot, put all of your brainpower into replacing the word “um” with silence.
Keep doing this and keep repeating your talk until you’ve mastered it. And then move on to the next point.
Now, these are just the essentials. And if you’re a seasoned speaker these can seem rather elementary.
But no matter where you are in your speaking career, observing yourself in the mirror and making improvements based on what you see never hurts.
It only aids in making you better, and as a result, impacts more people with your message.
Record yourself on video.
This is the next level up from the mirror practice technique.
But instead of only seeing yourself live you can actually playback your practice sessions one by one and see your improvement in real-time!
You can use a video camera for this or even just your phone.

Anything with video recording capability does the job.
This can be slightly stranger than the mirror technique because you actually hear your voice and how you sound to others.
And unless you’re used to hearing your recorded voice, this will take some getting used to.
But just like I mentioned in the mirror technique, you need to get over the weirdness and give it a shot!
This is a technique that works! And you don’t want to pass it up.
Now, to make the most of this practice technique you’ll want to look for all of the bullet points we mentioned in the mirror practice technique, plus a few more.
Here they are:
- Volume. Are you talking loud enough? Are you being too timid and quiet? Are you projecting your voice?
- Enunciation. Can you clearly hear yourself and understand what you’re saying? Are your words being pronounced with clarity?
- Pauses. Going back and reviewing Point #6 from this guide, are you including pauses in your speech to maximize how you engage your audience?
Once you’ve found an area you want to improve on from the bullet points above, focus on that one area until you’ve mastered it. This means starting over and recording yourself again.
Keep doing this over and over again until you’ve fixed the mistake.
But don’t try to fix multiple areas at once or you’ll just find yourself overwhelmed.
Focus on one at a time and you’ll slowly start seeing yourself improve.
So let’s get to it!
Putting Practice Into Practice
Go through each of these practice techniques one by one and give them at least 1 hour of your time.
1 hour isn’t a lot of practice time (relatively speaking).
And you’ll be pleasantly surprised by the massive results that follow.
Your time is now: Go, go, go!
9. Get your audience involved by making sincere eye contact
Imagine yourself sitting in the crowd listening to a speech.
The speaker paces back and forth a bit and does a great job of keeping you interested.
But as you squint and look closer, what is it that’s really keeping you engaged?
It’s their constant eye contact!

And while it’s not the only thing keeping you listening, it plays a very important part.
When the speaker makes eye contact with you (an audience member), you can’t help but feel like you’re a part of the speech.
Your brain can’t help but think that the speaker is actually talking directly to you because, in a sense, they are.
This is the power of sincere eye contact.
But the catch is, it has to actually be sincere.
People can spot insincerity from a mile away. And you don’t want to be the one who breaks down your audience’s trust.
You always want to be the speaker who builds that trust up in your audience.
So let’s dive right in.
Improving Audience Eye Contact
Here are a few techniques you can use right now to make better eye contact with your audience:
The first technique is called the “3-second method”.
Just as the name suggests, the 3-second method is where you look into the eyes of someone in your audience for 3 seconds at a time.
Let’s say you’re standing in front of an audience of 20 and giving a speech. Picture this in your mind for a moment.
Starting with the left side of the room, find someone looking your way and catch their gaze.
Now hold it for 3 seconds without looking away.
After you’ve broken their gaze, find someone in the middle of the room and catch their gaze.
Hold it for 3 more seconds… and repeat.
You can keep alternating back and forth between different audience members to show them that you’re actively involved and trying to have a conversation.
All it takes is a 3-second gaze.
The second technique is the “audience skimming effect”.
This is an add-on to the 3-second method we just talked about. It’s something that you sprinkle in between your individual 3-second gazes.
How does it work?
Well, it’s very simple.
The “audience skimming effect” occurs when you occasionally glance at the whole audience while speaking.
Instead of holding the gaze of one individual person for 3 seconds for the entire duration of your speech (this would be too much!), you occasionally add an “audience skim” to make things more natural.
This isn’t a rule, but I’d recommend 1 audience skim for every 5 eye-contact glances.
You can do a little more or a little less based on how the audience is responding and what feels most natural to you.
And that’s all there is to it!
Focus on the “3-second method” and the “audience skimming effect” in your next speech to make your audience more involved and engaged in your speech.
Now it’s your turn to get out there and put these two techniques into action!
10. Build trust and instant rapport by being a giver and not a taker
As humans, we have a few built-in “psychological triggers” that cause us to act and do things in a certain way.
For example, there’s the “reciprocity” trigger.
If someone helps us out with a random act of kindness we feel that we have to repay them in some way.

If we don’t reciprocate and respond in some way, we feel as if we owe something to that person.
That’s our brain talking.
So what can you do?
Well, you can harness the true power of reciprocity in your speeches by being a giver instead of a taker.
When you freely give value to your audience and help them out with their problems, they are far more likely to take action and do what you want them to do!
After all, when you give massive value the neurons in their brains fire at insane speeds. They tell them that you’re trustworthy and somebody who truly has their best interests in mind.
Why wouldn’t they think that?
You’re building trust and giving them extremely useful knowledge and information. Everybody wins!
I’m going to show you how to be even more of a giver in your next speech.
But before I do that, I want you to take a step back and think about the ultimate goal of your speech.
Giving Useful Information to Your Audience
After you finish your talk, what is it that you want your audience to do? Note that you can reference Tip #5 in this guide for a detailed breakdown about speaking with persuasive intent.
And if you’ve already followed the steps in Tip #5 you’re all ready to go!
Do you have your main audience goal in mind? Good.
It might be:
- Selling a product or a service (action is a purchase)
- Sharing your message with the world and getting people to believe in it and internalize it (action is true belief)
- Sparking people’s interest in your topic (action is taking up a hobby or joining a club around your topic)
.. and many more. The important thing is that you have your primary reason defined.
Now you want to think of actionable and extremely practical subtopics that you can talk about.
These are things related to the topic that help your audience with the topic (read: give value to your audience).
Whether that’s educating your listeners about something that beginners in your topic desperately want to know, or giving them a step-by-step plan to solve a major problem they had with your topic.
The most important part is that you give them value!
Once you’ve given your audience enough value and they begin to trust you as an expert, only then can you start telling them about your opportunity or product.
The key here is to give more than you take.
Give lots of valuable information and only then ask to take some of their time, effort, or energy.
Don’t try to take before you give.
Quoting speaker Simon Sinek,
“… people are more likely to trust a giver — a speaker that gives them value, that teaches them something new, that inspires them — than a taker.”
– Simon Sinek
This is my challenge to you.
Focus on giving more value than you’ve ever given before, and only then ask for something in return.
If you do this, you’ll see more results than you ever thought possible.
The time is now – let’s get out there and give more value!
11. Magnify your audience’s retention by reinforcing key points
When we hear something once we don’t really think about it too much.
It seems typical, normal.
When we hear something twice our ears start to perk up.
But what about when we hear something three times?
That tells us it’s probably important!
And by including repetition in your speeches, you’ll have an amazing tactical advantage.
You can use the power of repetition to talk about your most important points and let your audience know this is something they’ll want to remember.
The more your audience hears something repeated, the more likely they are to remember that information and actually act on it.
So let’s get into the good stuff!
Creating a Repetition Plan
We’re going to walk through creating a “repetition plan” for your primary key points so that your message is left ingrained in your audience’s minds.
Here’s how you do it:
We all know how important it is for you to repeat key points.
It’s what lets your listeners actually remember what you said after your speech is over.
But instead of getting into a complex strategy about the best way to include repetition in your talk, we’re going to go with the simple proven path.
It’s so simple you’re going to find it difficult to forget:
Mention each key point three times.
This doesn’t mean you repeat your key point three times all at once.
For example, this is something you DON’T want to do with repetition:
“Cats are furry animals. [pause] Cats are fluffy, furry animals. [pause] Cats are definitely furry animals.”
Example
You don’t want to repeat the same thing 3 times with a pause in between. Your audience is going to think you’re crazy.
As a matter of fact, they just might remember your main point because of how crazy you sound.
Unfortunately, this is not an ideal strategy.
A better way would be to break up how you mention each key point into three steps:
Mention your point for the first time when you introduce it
Mention it in the middle body of your content while talking about it
Mention it in the end when wrapping up your subpoint and tell the audience what they learned.
This is pretty much along the same lines as:
- “Tell them what you’re going to tell them”
- “Tell them”
- “Tell them what you told them”
The main thing for you to remember is that you have to repeat what you want your audience to take away from your speech.
You have to repeat it multiple times.
The more you repeat, the better they’ll be able to recall it.
And now it’s your turn.
Think about how many times you mention what your key points, or audience, is going to take away from your speech.
The challenge is to increase this by at least one more mention making it stick in your audience’s minds even more.
So let’s get to it! Get out there and take action!
12. Kick anxiety and restless thoughts to the curb by calming your mind and meditating
With thousands of thoughts bombarding our brains every second, sometimes it seems impossible to relax.
But that’s just not true.
Relaxation is very possible, all you have to do is take the time and put in some genuine effort.

Whether you want to meditate or just lay down quietly and let your thoughts wander, the choice is yours.
It might not seem like much, but taking even 5-10 minutes out of your day to calm your mind is well worth it.
Have you ever known a speech you were going to give inside and out, yet when you get up in front of an audience you can’t remember a single word?
This isn’t a memory issue.
It’s your anxiety turning off pathways in your brain as it prepares for its “fight or flight” response.
A calm mind is a confident and creative mind.
And if you want to improve both your confidence and creative ability, a calm mind is the way to go.
To prove this to you, let’s go through some pre-recorded relaxation tracks and/or meditations you can use right now to calm your mind and get into a peaceful, relaxed state.
Here they are:
This is a list of some awesome resource recommendations from the Hero Movement (a big thank you to Luke for originally compiling this list, all credit to him!):
- Do Yoga With Me – 30 tracks, 9 to 60 minutes, paid content
- The Free Mindfulness Project – 30 tracks, 3 to 45 minutes, free downloads
- Chopra Centered Lifestyle – 16 tracks, 5 to 60 minutes, free
- UCLA Meditation – 8 tracks, 3 to 12 minutes, free
- Fragrant Heart – 50 tracks, 1 to 30 minutes, paid content
- Tara Brach – 100+ tracks, 10 to 40 minutes, free (comes highly recommended)
- Meditation Oasis – 50 tracks, 8 to 25 minutes, free
I only listed the first 7 here (Luke had 12 total), but this should be a great starting point for you to head out and get a head start.
Most of the resources listed above are also absolutely free, giving you no excuse to start now.
All you have to do is find something that works for you and block off some time to wind down and relax.
For me personally, following along with a guided pre-recorded track telling you exactly how to relax has been incredibly helpful.
Now it’s your turn.
Find a relaxation or meditation resource that works for you and give it a shot, even if it’s only for a few minutes.
You’ll find yourself more calm, relaxed, and ready to push forward at full speed!
13. Actually be heard and understood by projecting vocal power
Am I the only one bothered by this?
Someone gets up on stage to talk and you quickly realize they have no idea how to properly hold the mic.
You can’t hear a thing they’re saying.
What usually happens is they end up speaking right past the microphone.
They talk to the whole room with their regular conversational voice, but unfortunately, nobody sitting in the middle or the back of the room can make out a single thing they’re saying.
Don’t let this be you.
Learning to project your voice is a powerful technique that lets you exude confidence and communicate to larger audiences effectively.

Let’s go over some ways you can work on vocal projection right now!
To start, I’m going to talk about something that seems a little contradictory.
You could probably imagine that to speak louder and project your voice more your muscles need to work and strain at a higher level.
Makes sense intuitively, right?
Well.. that’s actually not the case.
The key to voice projection is speaking louder without any exertion.
By watching your breathing and relaxing your shoulders, head, and neck, you can project your voice further and speak louder.
Here are two general rules of thumb:
Practice Good Posture
No matter whether you’re sitting or standing, good posture helps eliminate tension from our neck, shoulders, and head.
And how do you know you’re in good posture?
When you’re truly in a good posture you won’t be slouching, leaning over, or clenching your teeth.
It’ll feel very natural and fluid, not forced and uncomfortable.
Don’t Strain
This ties in directly with having good posture.
When you have good posture, you’ll be straining your voice less as you try to talk louder.
Remember, when you properly project your voice you won’t feel any extra strain.
Proper voice projection doesn’t require any extra effort.
And again, despite what you might initially think, you’ll be at your loudest when you’re most relaxed.
Being gentle is the key to getting louder.
If you want to learn even more about voice projection and try out a few exercises, check out SLT Info’s Voice Projection Exercises (kudos to Graham for teaching us more about voice projection!).
And now we turn it over to you.
Go ahead and try a few voice projection exercises that work for you. You can start off with several minutes a day and work your way up.
The most important thing for you to do right now is to just get started and begin building up that momentum!
Good luck!
14. Keep your listeners engaged and invested by repeating audience questions
People aren’t robots.
We can’t pay attention to everything 100% of the time with perfect recall.
And I have to admit that there were several times when listening to a speech, that I missed a question somebody from the audience had asked.
It just flew past me and I had no idea what they said.
And since the speaker didn’t repeat that question back to the audience, I still had absolutely no idea what was asked.
Your audience can be the exact same way.
There’s might be a person or two who either don’t understand a question or don’t quite hear it correctly.
Do them a favor: Always repeat audience questions!
By giving your listeners a second chance to hear what was asked, you keep your audience invested in the answer and actually engaged in the conversation.
Not only that but repeating a question right after it was asked gives you a few moments to collect your thoughts and think about how you’re going to approach the answer.

Sometimes, especially with very tough questions, you could use a few moments to gather your thoughts before jumping into an answer.
This gives you that opportunity.
And as a final thought, repeating an audience question helps make sure that you understand the question and have time to fully comprehend what it is they’re trying to ask.
It forces you to actively listen to your audience members and understand exactly what they’re trying to say.
A winning combination for any Question and Answer (Q&A) session!
And now we turn it over to you.
What reminders, cues, or habits can you implement that’ll help you remember to repeat your audience’s questions the next time you speak?
This can be any cue you want.
For example, maybe you have a brightly colored pin you can see out of the corner of your eye.
Or a prominent shape on your Q&A presentation slide that catches your eye.
You can be creative here.
The goal is to create a cue for yourself until you naturally start remembering to repeat every question your audience asks back to them.
Go ahead and create a cue, and most importantly, don’t forget to use it in your next presentation!
15. Masterfully transition from topic to topic with the Speaker’s Triangle
A typical speech has an introduction, three points, and a conclusion.

Structuring your speech this way strikes a great balance between having too much and too little information for your audience.
It’s usually just enough for your listeners to remember.
And that’s exactly the way you want it!
But have you ever thought about how professional speakers transition from one topic to another in a way that almost seems to “hypnotize” their audience?
What’s their secret?
Well, it’s called the “Speaker’s Triangle”, and it’s essentially a movement pattern that switches between three stage positions based on where you are in your speech.
Let me explain.
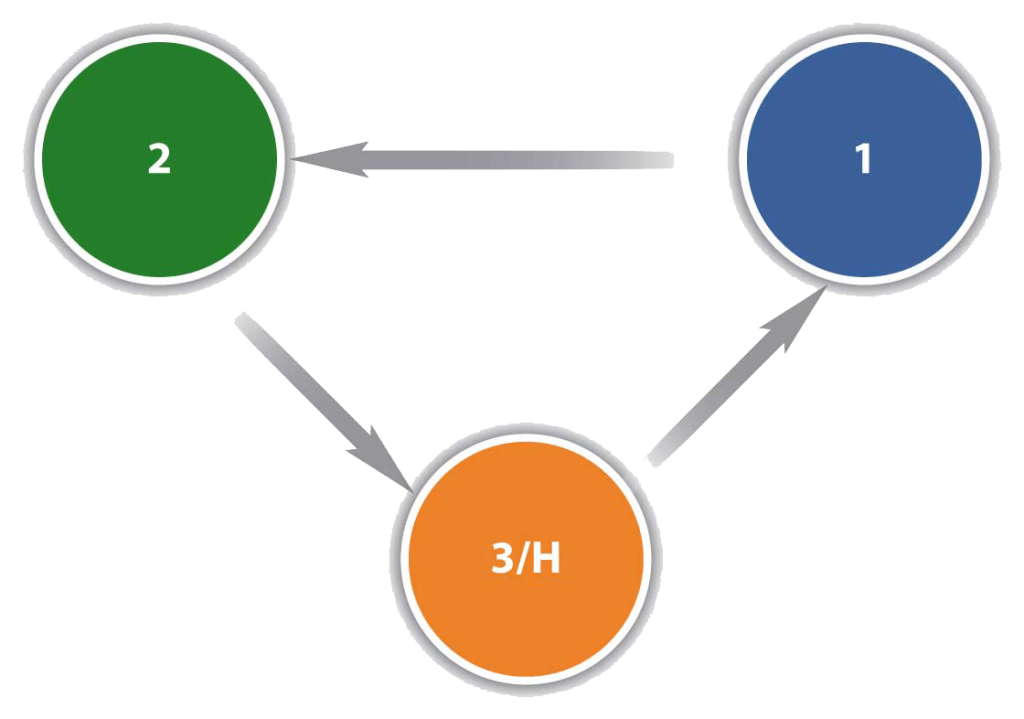
The figure above, originally created by FlatWorld Knowledge, shows a triangle with a series of transitions from one node to another.
Each node is a physical position on the stage, so you can imagine us looking down from a top view and seeing the speaker move throughout their presentation.
The “Home” position (orange node) is where the speaker starts at the beginning of their presentation.
This is the introduction where they introduce the topic and stand front and center in front of the audience.
As they move into their first point they move to the first position (blue node).
For the second point, they move across the stage to the green node.
And finally, for both the third point and their conclusion, they move back to where they started to the “Home” position (orange node).
What does this type of movement do for your speech?
Well, an immediate bonus is that it helps you remember your primary points better.
Since each point is associated with a physical position on the stage, you have a second sense you use to memorize and recall what you’re going to talk about.
And even though physical movement is a great memory tool, it also helps with the organization of your speech.
Instead of having each point “blur” into the other, the physical act of moving from one position to the next lets you break down your transitions into manageable parts.
It creates a strong cue for you to start transitioning into the next topic instead of jumping right in.
And as an added bonus, moving from one position to the next while delivering your speech helps your audience see you as a confident, reliable, and credible speaker.
Now that you know how physical movement helps you organize and deliver your speech with a higher degree of professionalism and authority, it’s time for you to implement and take action!
A good way to remember exactly where you’re going to stand and transition during your speech is to create a speaker’s triangle on the ground.
You can use masking tape, paper, small objects on the floor, etc.
Anything that stands out from the color of the floor and is clearly visible to you will work great!
The opportunity is all yours.
Let’s get out there, mark some floors, and master the speaker’s triangle!
Concluding Thoughts
And there we have it!
You don’t have to do every single item on this list, but it’s important that you pick a couple that stand out and take action.
Remember: The key is to start small.
And with every small step, you’ll get closer and closer to becoming the incredible speaker you want to be.